
Use assignments to give named learners, students, or groups in your workspace a clear next step. Choose a course or selected lessons, set completion requirements, and add a due date or welcome message. For external documentation or a customer or partner academy, use a Site.
1. Choose the course
- Open Assignments → New assignment. You can also open the course’s manage screen and choose Assign.
- Add an optional Name, such as Product onboarding practice.
- Search under Course, or use Browse catalog.
- Select the intended course by its title and cover. The selected course appears as a chip.
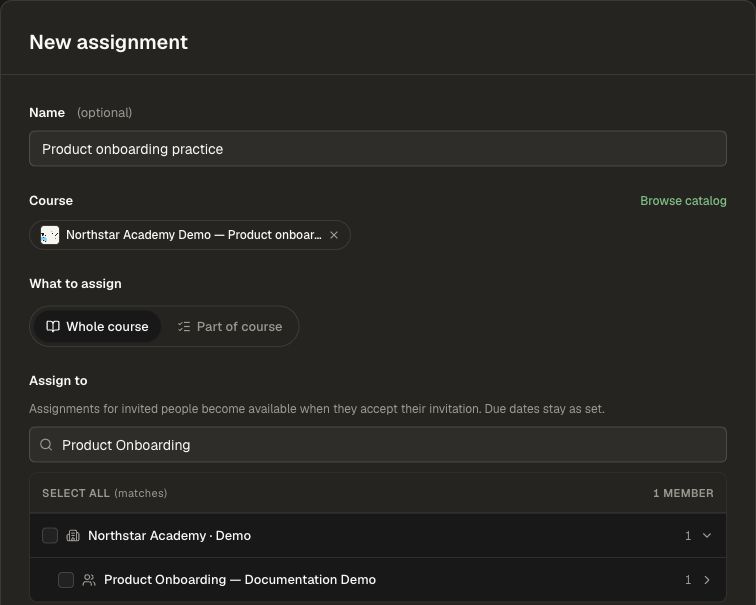
Search may return other courses you can access. Confirm the exact title before selecting it.
2. Choose all or part of the course
- Under What to assign, keep Whole course for the complete course.
- To narrow the work, choose Part of course.
- Expand the unit with its disclosure arrow.
- Select the unit, individual lessons, or test you intend to require.
- Confirm the selected-item count.
Select the lessons and tests that support the assignment’s goal, then set the activity and score requirements below.
3. Choose recipients and timing
- Search Assign to for a group or person.
- Expand a group to inspect its members, or collapse it for a concise review.
- Select only the intended recipients. Selecting the workspace applies broadly.
- Set an optional Due date.
Without a due date, the interface describes the work as a standing recommendation with no overdue flag. Invited people receive access after accepting their invitation; the due date stays as configured.
4. Set completion requirements
- Set Activities per topic to a number, or choose All.
- Set a Minimum quiz score if needed; a blank value counts any completion.
- Decide whether Unit tests required should apply and set the Minimum test score.
- Decide whether Projects required should apply.
- Optionally enable Custom retention to override this content's check-in schedule for the assignment.
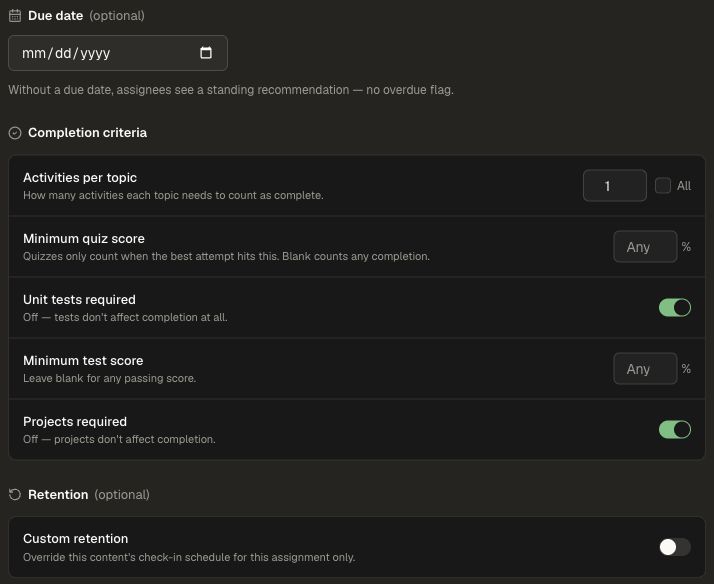
Review the selected requirements together so learners have a clear definition of completion.
5. Review and send
Add an optional Message, review the content and recipient selection, then choose Assign when ready. The form states that the message is sent once to everyone receiving the assignment.
Return to Assignments to inspect course, recipients, completion, due date, and assigned-by details. Use the course, recipient, and status filters to narrow the list. Learners find their work under My Assignments.
Tips for a smooth setup
- Complete the selection: choose content and at least one recipient. A partial assignment also needs at least one selected item.
- Confirm the course: check its title and cover; use the chip's remove control to change it.
- Compare completion fairly: review each learner's assignments and requirements alongside their progress.
Prepare recipients with People, Groups and Workspaces, then inspect results in Analytics and Reporting. For a path spanning several courses, use Curricula and certificates.