
Choose how visitors discover your academy, how learners sign in, and who can maintain the Site. Keep those choices aligned with the audience for the selected courses and documentation.
Set visibility and sign-in
- Open the Site's Settings.
- Choose Visibility: Public, Unlisted, or Auth required.
- Choose whether search engines may index the Site.
- Use Public only for an open documentation destination, or configure sign-in for a learning program.
- Enable Require sign-in to take courses when learners should authenticate before entering courses.
- Save your settings and review the experience as the intended visitor.
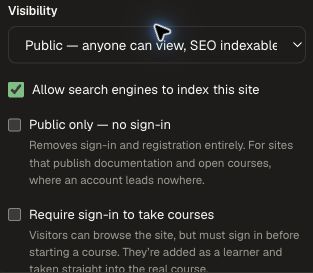
An unlisted address can still be shared with someone who has the link. Use authentication when the audience should sign in. Public-only mode removes account-dependent onboarding options.
Set up custom onboarding
- In Settings, enable custom onboarding for a Site that supports sign-in.
- Save, then open Onboarding from Pages.
- Use the Site assistant to describe the questions and welcome flow, such as the learner's role, product experience, and learning goal.
- Review the onboarding preview and refine the flow before publishing.
- Choose whether Show onboarding data in People should expose submitted answers to authorized Site managers.
- Publish when the welcome flow and access settings are ready for new learners.
Onboarding helps a new learner enter the program with the right context. Signing in through the Site places new external learners in the Site's external learner group and gives them the learning access associated with that Site. Internal workspace members retain their existing workspace membership.
Review onboarding responses
- Open the Site editor and select Onboarding.
- Open Data when the Site's onboarding database is available.
- Choose a database and table to browse collected responses.
- Use the read-only query editor when you need a more focused view of the stored data.
- Review the associated member information in People when that option is enabled and your role permits it.
Keep response access with the people managing the program. Ask only the questions needed to support the learner's experience.
Share Site editing responsibilities
- Open Share as a Site publisher or manager.
- Search for a person already in the workspace.
- Choose Can edit for drafting, or Can edit and publish for someone who should release changes.
- Choose Share and review the editor list.
- Remove a person's Site-specific grant when their responsibility ends.
People with workspace-wide Sites permissions retain that access. Sharing a Site's editor is separate from configuring its visitor audience.
Prepare search and social previews
- In Settings, open the SEO and sharing controls.
- Enter the Page title and Description. The editor allows up to 70 and 200 characters respectively.
- Upload a social sharing image. Use the recommended 1200 × 630 format and keep the file within the displayed 5 MB limit.
- Save, then review the Site's title, description, and sharing appearance at its published address.
Use a specific title and description that explain who the academy serves and what visitors can achieve.
Manage addresses and embedding
Use Settings → Address for the included Honen subdomain and custom hostnames. Follow Connect your custom domain for DNS provisioning, or Mount under an existing website for a path such as /docs.
Add intended website origins to Allowed embedding origins when mounting or embedding the Site. Review nested links, documentation images, sign-in, and assistant behavior from the final address.
Save, publish, and maintain the Site
- Use Save to preserve the draft and Publish to release it.
- Use Reset when you want to discard unsaved editor changes and return to the saved version.
- In Settings → General, maintain the Site name and slug. A slug uses lowercase letters, numbers, and hyphens; changing it also affects the included address and may require provisioning.
- Use Archive site in the advanced settings when the Site should go offline.
- Use Delete site only when you intend permanent removal; review the confirmation before completing it.
Review the public home page, a nested guide, search, course entry, and the expected authentication flow after each release. See Publish an academy for the full launch sequence.