
Give each cohort a home for its courses, learning paths, assignments, and progress. Use groups for departments, customer cohorts, partner programs, or successive onboarding classes; use subgroups to organize a larger audience.
Create your first group
- Select the workspace that should own the cohort.
- Open Organization → Manage Groups, or My groups when it appears in your navigation.
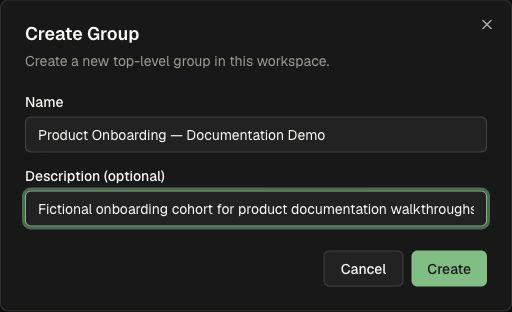
- Choose Create Group.
- Enter a Name and an optional Description that explains the audience.
- Choose Create, then open the new group.
The creator joins automatically. Group management controls are available to people with the appropriate group or workspace permissions.
Create a subgroup
- Open the parent group.
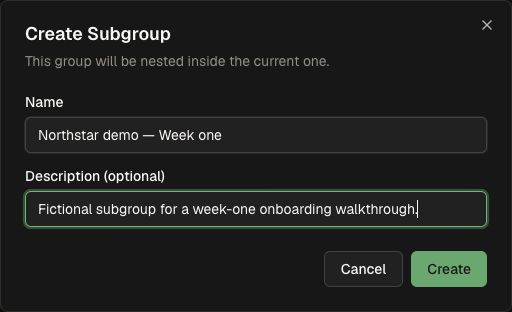
- Select Subgroups → Create Subgroup.
- Enter the subgroup's name and description. For example, use a separate week-one cohort inside Product Onboarding.
- Choose Create and open the result.
- Use the group's navigation to return to its parent or another subgroup.
The group list supports search and expanding or collapsing the hierarchy. Select the intended parent before creating a subgroup so that the cohort appears in the right branch.
Add and manage members
- Open the group's Members page.
- Open its membership manager and select the people to include. A top-level group draws from workspace members; a subgroup draws from the parent group's members.
- Review the pending additions and removals, then choose Save changes; the button includes the number of changes.
- Use All Roles, All Status, and All Tags to find a cohort segment. Use Columns to choose the details in the table.
- Open a member's actions to Edit role, edit tags, or Remove from group, according to your permissions.
A group role applies within that group. Review access and roles before choosing management permissions. To bring a new person into the workspace first, follow member invitations.
You can also open a person's group memberships to manage their place in the hierarchy. Adding them to a nested group includes the required parent memberships; removing them from a parent removes memberships in its subgroups. Review the affected groups before saving.
Add courses, catalogs, and learning paths
- Open Home → Content library, or use the dedicated Courses page.
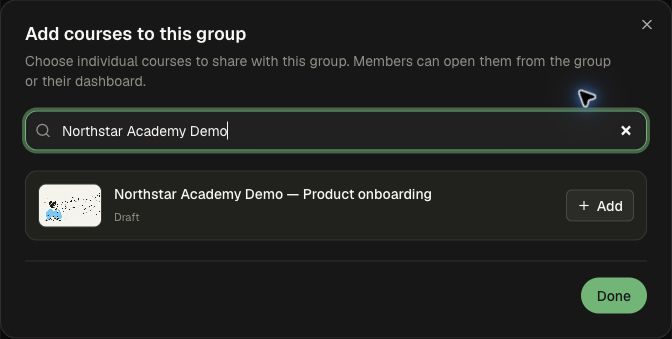
- In Courses, choose Add courses, search by title, and choose Add beside each intended course.
- Choose Done when the selected list is correct.
- In the content library's Catalogs tab, choose Add a catalog, select a catalog, and choose Attach to include its available content.
- Use Curricula → Add curricula for published learning paths. Search, add the intended curriculum, and choose Done.
Prepare and publish learning content before presenting it to learners. Course access and an assignment serve different purposes: access makes learning available; an assignment adds recipients, requirements, and an optional due date.
To maintain the collection, use the item's remove action in Courses, Curricula, or Catalogs. Removing a catalog removes that source of access; a learner can still have access through another grant. Use Undo when offered after removing course or curriculum content.
Build the group's home page
- Open Home as a group manager.
- Choose a section from Add section: Category heading, Course row, Path, Vertical path, Highlight, or Trending.
- Edit the section title and choose its content. Use Content library first to prepare the courses and paths available to the group.
- Use the section's reorder handle to arrange the page. Keyboard users can focus the handle and use the up and down arrows.
- Use the section's show/hide control to prepare content before displaying it. Use its delete control to remove an unwanted section.
- Choose Preview to review the learner's home page. Changes to the group home editor save as you work.
Arrange the first row around the learner's next action, such as “Start your product onboarding,” then place optional reference courses below it.
Follow assignments and progress
- Open Assignments to review required work for the cohort.
- Open Analytics to review the group's members, courses, completion, scores, and learning modes.
- Select a course or learner to investigate the relevant detail.
- Use the analytics question library to ask a focused follow-up about the group.
Rename or retire a group
- Open Group settings.
- Edit Name or Description, then choose Save Changes.
- To permanently remove a group, use Delete Group in the danger zone, read the confirmation, and enter the required group name.
Deletion includes the group's descendants. Review the hierarchy and any active assignments before confirming this permanent action.
Continue with curricula and certificates or analytics and reporting.