
Create a consistent branded journey from the first academy page to the learner's course. Use the Default visual editor for templates and page blocks, or Custom mode for an assistant-built experience.
Choose a starting layout
- Open the Site and keep Default selected.
- In the right-hand Layout tab, choose Template: Courses & documentation, Academy, Knowledge Base, or Developer docs.
- Expand Introduction and write a clear heading and description.
- Review the preview and choose Save.
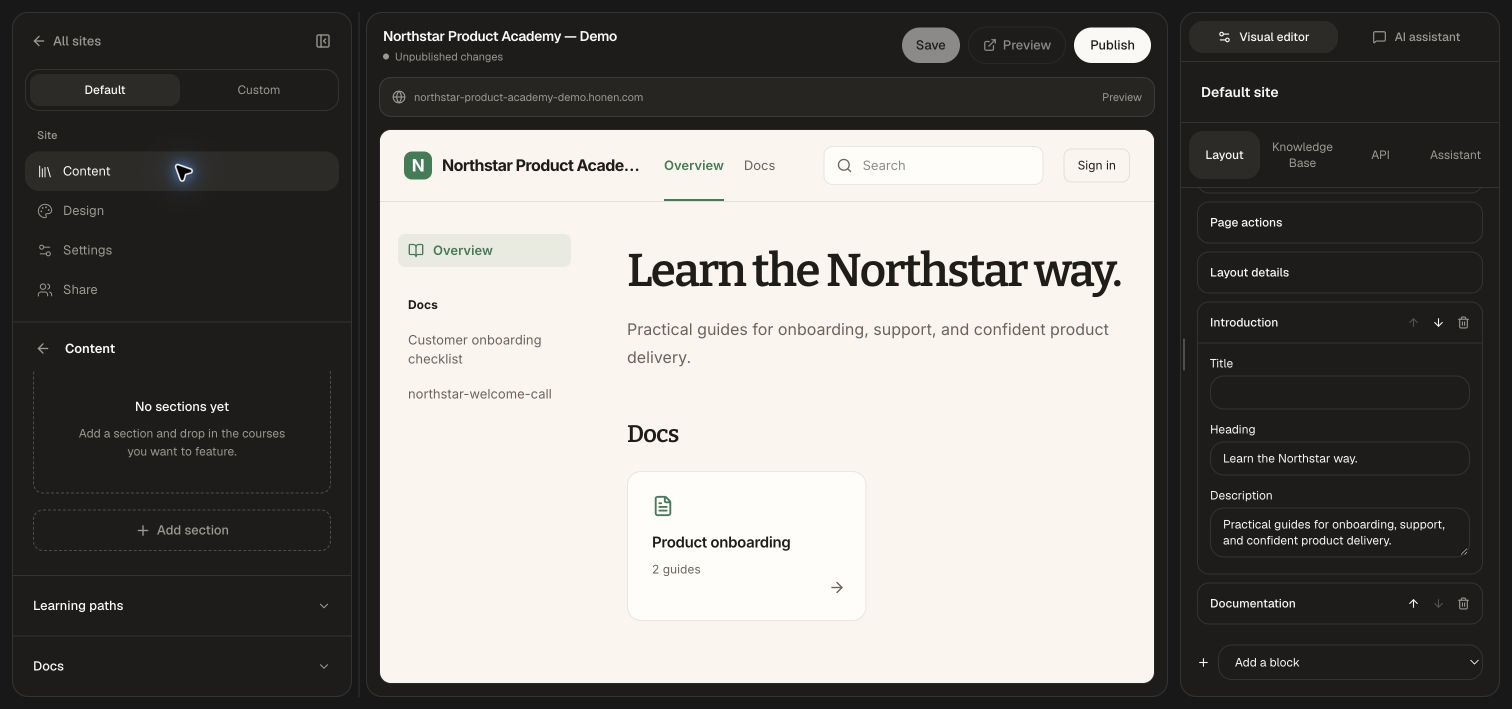
Templates provide a starting arrangement. Your selected content and brand settings remain part of the Site.
Arrange page blocks
- In Layout, use Add block to choose the section you need.
- Expand the new block and fill its fields.
- Use Move block up and Move block down to arrange the page.
- Use Remove block for a block you no longer need.
- Save and review the complete page.
| Block | Use it for |
|---|---|
| Introduction | The page's opening message and next action. |
| Courses | Selected learning content. |
| Documentation | Entry points into the guide library. |
| API reference | A developer reference entry point. |
| Text or Callout | An explanation or emphasized instruction. |
| Cards | A set of related destinations. |
| Questions | Common questions and answers. |
| Code | A code example. |
| Steps | A sequence the visitor can follow. |
| Image | A visual with the accompanying fields offered by the editor. |
Use Curate Site content to prepare the courses, paths, and documentation behind those blocks.
Apply your brand
- Open Design → Branding and upload the Logo and Favicon.
- Under Colors, choose a palette: Editorial, Clean, Bold, Academic, Warm, Midnight, or Custom.
- Adjust Primary, Background, Text, Card, and primary/secondary button text colors using the pickers or hex fields.
- Expand Typography to choose heading and body fonts.
- Expand Layout to choose corner radius and spacing.
- Save and inspect headings, body text, cards, and buttons together.
For a consistent signed-in experience, enable Theme dashboard and courses under Learning experience. Set the light and dark palettes, or use Copy brand palette for the selected mode, then review the contrast checks. These settings apply when learners enter through the verified workspace or Site domain. Choose Learner experience from Pages to preview the result.
Configure the top bar and navigation
- In Layout, expand Top bar & navigation.
- Choose whether to Keep navigation visible, show Search, show the Name beside logo, and display Section tabs.
- Adjust the top bar height.
- Add Top links with a label and destination, such as an internal
/docsroute or an HTTPS destination. Reorder or remove links as needed. - Enable the primary button, enter its label and destination, and choose its Button placement: top bar or top of the left sidebar.
- Use Choose section tabs to curate section destinations and their order.
- Save and follow each destination in the preview.
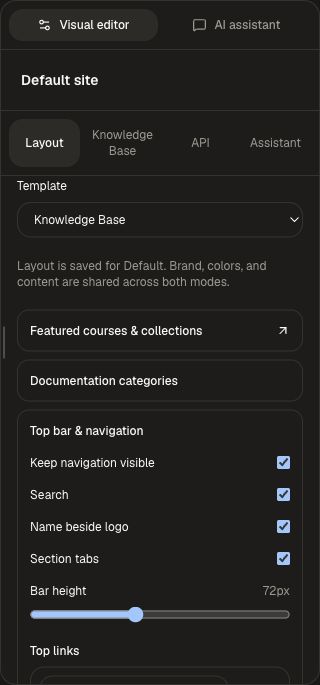
Use up to eight top links to keep the primary navigation focused. Match labels to the task visitors want to complete, such as “Learn,” “Guides,” or “API reference.”
Tune spacing and page actions
- Expand Padding & spacing.
- Adjust side padding, top/bottom padding, space between sections, and navigation width. Use Reset spacing to return to the starting values.
- Expand Page actions and choose the reader tools to offer: copy as Markdown, copy an LLM prompt, download Markdown, and copy the page link.
- Review the page at a narrow and wide browser width. Spacing scales down for smaller screens.
Add a standalone page
- Return to Pages in the left sidebar.
- Choose Add page and enter the page title in the prompt.
- Open the new page from Pages. It receives its own page route and a top-navigation link.
- Use the Site's AI assistant to describe the page content you want, naming the selected page and the desired visitor action.
- Review the generated page, save the draft, and include it in your next publication.
To remove a standalone page, use its remove control in Pages and confirm the named page. Review navigation afterward. Built-in Home, Course page, Docs, and learner pages have their own content and configuration controls.
Work in Custom mode
- Save the current draft.
- Choose Custom, read the mode description, and confirm the switch.
- Describe the page structure, content, and interactions in the Site assistant. Use concrete instructions, for example: “Create a customer onboarding homepage with a welcome message, three learning steps, and links to our selected guides.”
- Review the generated preview, then ask for focused refinements.
- Save and publish after reviewing the complete visitor journey.
Default layout settings are retained for Default mode; brand and selected content are shared across modes. Review the mode switch and preview before publishing a change of presentation.
Continue with API reference and visitor assistant or access and onboarding.